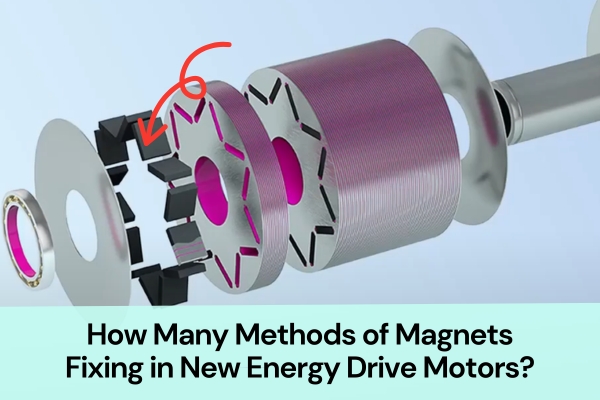
How are magnets fixing inside the rotor core of a permanent magnet motor rotor? This is one of the most important questions in modern drive motor design.
Since most drive motors today are permanent magnet synchronous motors (PMSM), magnets fixing methods directly affect motor performance, safety, and reliability. A small number of drive motors still use asynchronous motors, but they do not involve magnets at all.
In this article, I will introduce and compare several common methods of magnets fixing in interior permanent magnet motors (IPM). Each process has its own background, advantages, and disadvantages, and knowing them will help engineers choose the best solution for high-speed, high-efficiency applications.
Riveting Fixing
Currently, this method is rarely used. During the riveting process, magnets are prone to cracking, and it is difficult to detect these failures. As motor speeds continue to increase, the risk of failure becomes even greater, so riveting is not recommended.
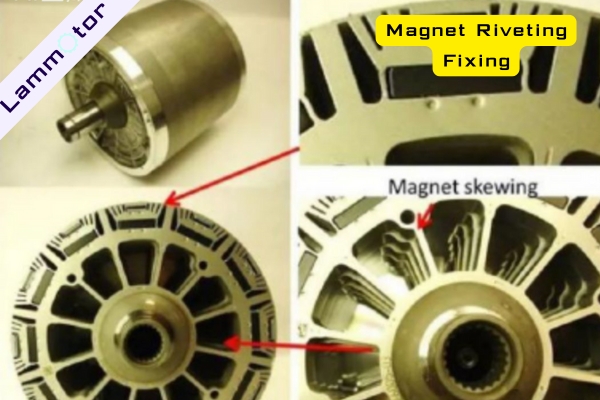
This method was first applied to the BMW i3 motor. The purpose was to save adhesive or molding materials and reduce energy consumption compared to curing or heating. It also simplified automation and improved production cycle time.
However, in practice, due to differences in rotor core stacking thickness and the limited maturity of equipment, the overall process performance was not reliable.
Main issues with riveting:
- Rotor core consistency problems make the riveting effect hard to control.
- Magnet fragility—cracks occur easily during riveting and are difficult to detect.
- High failure risk, especially at higher rotational speeds.
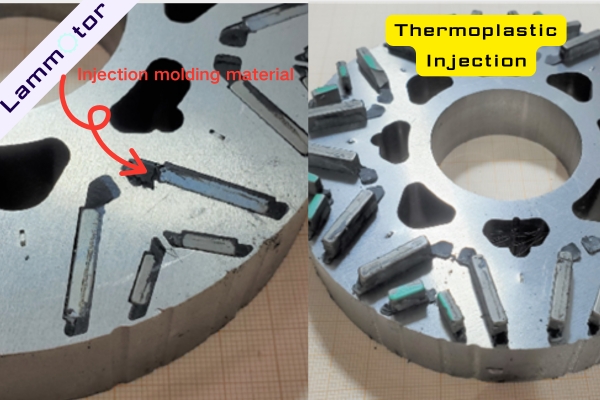
Injection Molding Fixing
Fixing magnets into the rotor core using injection molding is very common. There are two approaches: thermoplastic injection and thermosetting injection.
Thermoplastic Injection
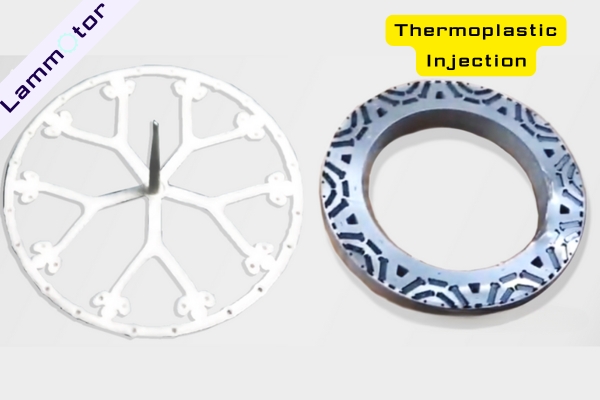
Nylon 66 with 30% glass fiber is a typical thermoplastic material. It softens when heated and hardens when cooled. Motors using this method usually do not run at very high speeds. For speeds above 15,000 rpm, most manufacturers prefer thermosetting injection with epoxy molding compounds (such as Sumitomo EMC).
Advantages:
- High efficiency.
- Simple process.
- Environmentally friendly.
- No additional curing needed after molding.
Challenges:
- Heating above 160°C risks partial demagnetization.
- Post-assembly magnetization is difficult and may not reach ideal saturation.
- Mold redesign costs add to production expense.
- Filling, demolding, and material utilization require careful optimization.
Thermosetting Injection
To overcome the drawbacks of adhesive bonding, thermosetting injection has become the most popular magnets fixing solution in permanent magnet motors. Compared to adhesives, thermosetting molding offers clear advantages in cost, cleanliness, and durability.
Main materials used:
- PA66 – low cost (~30 RMB/kg), poor flowability, usually limited to single-stack injection.
- Sumitomo M500A (epoxy-based) – higher cost (~150 RMB/kg), but excellent flowability, enabling full rotor encapsulation, reducing rotor runout, and improving NVH performance.
- Yuanzong 8200TM (unsaturated polyester) – naturally lower cost than epoxy, easier storage, and already in mass production.
Today, thermosetting injection molding is the mainstream magnets fixing method for permanent magnet synchronous drive motors.
Magnet Bonding (Adhesive Fixing)
Using adhesives to fix magnets is another mainstream solution. It includes dispensing bonding and potting bonding.
Dispensing Bonding
This method applies adhesive spots between magnets and the rotor core without full slot filling. It is widely used in automated production lines because it avoids excess adhesive leakage and does not require clamps or fixtures.
Typical adhesives are single-component or two-component fast-curing glues. After magnets are inserted, the adhesive cures naturally or with UV/heat assistance.
Example: DELO DUALBOND Rotor Magnet Bonding Process
1. Dispensing
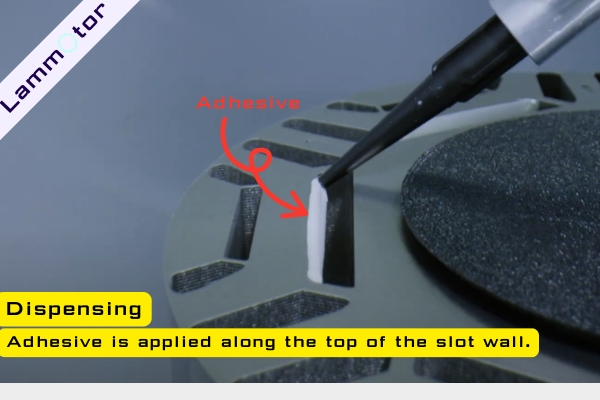
Adhesive is applied along the top of the slot wall. The material flows easily and can be dispensed very precisely, so the right amount of glue is always in the right place.
2. Joining
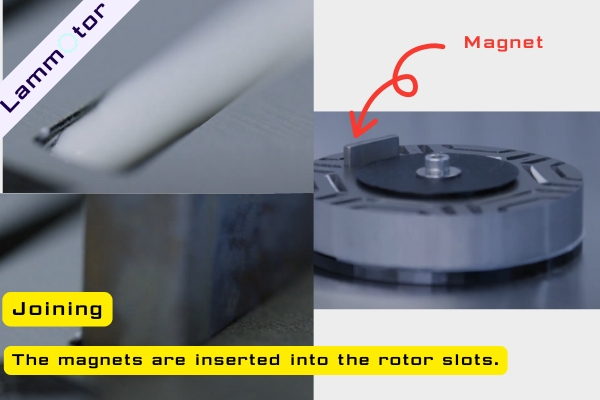
The magnets are inserted into the rotor slots. As they slide in, the adhesive spreads and fills the gaps, making sure the magnet sits firmly against the core.
3. Light Fixation
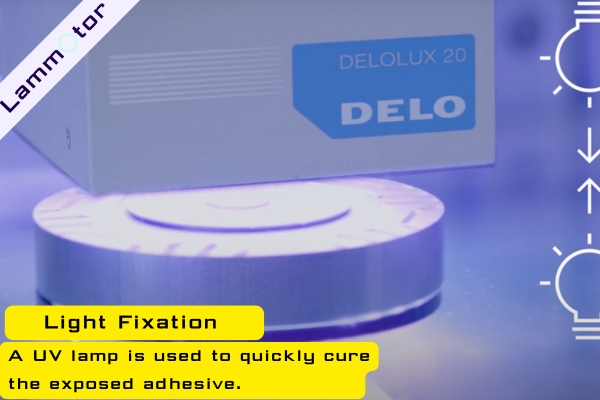
A UV lamp is used to quickly cure the exposed adhesive. Within a few seconds, the magnets are fixed in place and won’t move around anymore. This step is mainly to lock everything in position before the final cure.
4. Final Curing
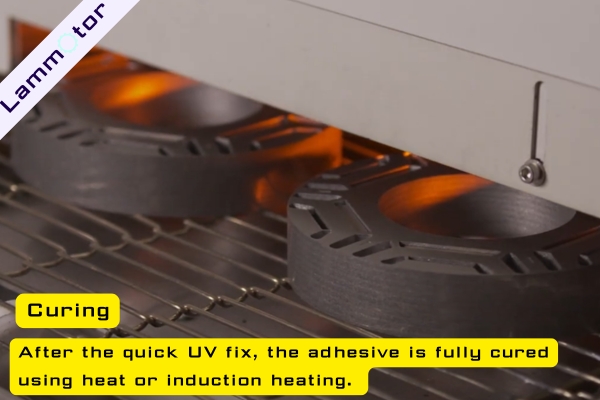
After the quick UV fix, the adhesive is fully cured using heat or induction heating. This makes sure even the shadowed areas (where UV light can’t reach) are completely cured. The result is a strong, heat-resistant, and long-lasting bond.
This process combines fast handling with reliable strength, making it an excellent magnets fixing method for permanent magnet rotors.
Potting Bonding
Potting, also called encapsulation, uses two-component epoxy resin to fill the gap between rotor core slots and magnets. Since the gap is usually less than 0.277 mm, the adhesive must have good flowability.
Early methods relied on low-viscosity adhesives with locking fixtures. The rotor core was clamped, then adhesive was injected through an opening at the magnet slot or top plate. Some manufacturers also tried vacuum potting to improve filling. However, this process required extra fixtures, heating, and post-cleaning, making it less suitable for mass production and automation. It also carried a risk of adhesive penetration between laminations.
With advances in precision screw pump metering and improved epoxy formulations, modern processes now use high-viscosity one- or two-component adhesives that cure quickly. This allows fixture-free potting, short surface-dry times, and immediate continuation of assembly without delaying curing.
Currently, two categories are common: one-component and two-component adhesives.
Method 1: Potting After Inserting Magnets
DELO DUALBOND Magnet Bonding Process
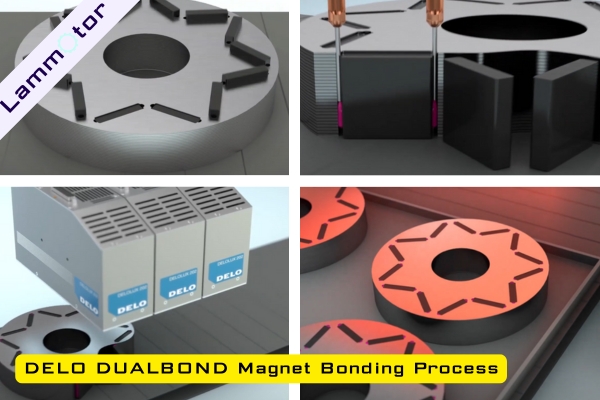
1. Placing the Magnets
- Non-magnetized magnets are placed into the rotor slots.
- Positioning tools or design features ensure the magnets sit correctly in place.
2. Dispensing the Adhesive
- Adhesive is dispensed along the side gaps of the magnets.
- Thanks to optimized viscosity, the adhesive stays in the slots without dripping or flowing away.
3. First Curing – UV Light Fixation
- The visible adhesive at the slot opening is cured with UV light.
- Within seconds, the magnets are firmly fixed in position.
- The rotor can be handled or moved immediately without additional clamps or fixtures.
4. Second Curing – Heat Curing
- Adhesive in shadowed areas where UV cannot reach is cured by heat.
- This completes the curing process and ensures a strong, heat-resistant, and durable bond.
Method 2: Potting Before Inserting Magnets
XETAR Two-Component Epoxy Resin Magnetic Circuit Potting Process
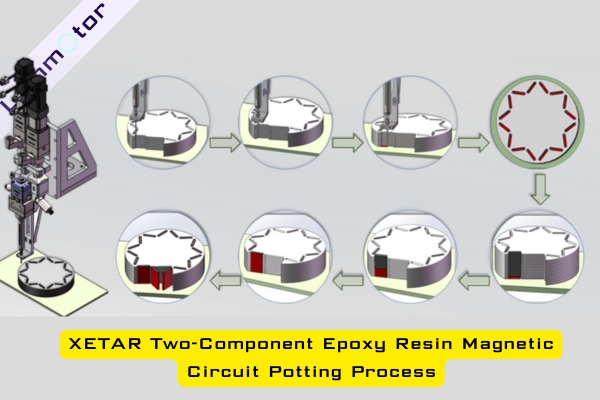
The XETAR potting process is applied in fixture-free magnet encapsulation. It uses one- or two-component epoxy resin with high initial viscosity and short surface-dry time after heat curing. This allows fast continuation of subsequent assembly steps while the adhesive continues curing, thus significantly improving production efficiency.
Comparison between DELO and XETAR potting:
- DELO requires UV pre-curing and then heat curing, while XETAR uses faster heat-curing epoxy.
- Dispensing after inserting magnets has lower efficiency, affecting cycle time.
- Adhesive bonding mainly occurs at magnet ends, while flat surfaces may have less bonding.
Both processes show how magnets fixing continues to evolve with better adhesives and equipment.
Conclusion
In summary, the main magnets fixing methods for permanent magnet drive motors include riveting, thermoplastic injection, thermosetting injection, dispensing adhesive bonding, and potting bonding. Riveting is outdated due to reliability concerns, while thermosetting injection and adhesive bonding processes (dispensing and potting) dominate the industry today.
These methods each have strengths: injection molding is efficient and clean, while adhesive bonding allows flexibility and strong fixation. Engineers must select the right magnets fixing process depending on motor speed, cost, and production needs.
👉 Which method do you think works best for your PMSM rotor core design? If you need high-quality stator and rotor cores for permanent magnet synchronous motors, contact us today.